IoT固件提取并使用qiling进行fuzz 固件提取 这里说的固件提取主要讨论的是如何从得到的固件包中提取完整的squashfs-root目录,即IoT精简的Linux,本片以路由器固件作为示例。
固件包的格式一般有bin,chk等,获取方法一般有硬件跳线,升级固件过程中的数据包捕获,官网提供的升级包等。
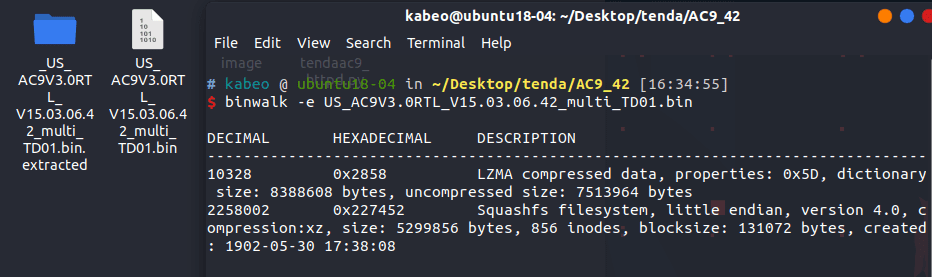
获取到固件后一般会使用binwalk -e进行提取,但只安装binwalk会提示
也就是说,squashfs镜像能够成功提取,但无法解压,这里有两种解决方法:
安装squashfs-tools 和sasquatch
对于squashfs-tools只需要
sudo apt install squashfs-tools
sasquatch需要自己编译
sudo apt-get install build-essential liblzma-dev liblzo2-dev zlib1g-dev git clone https://github.com/devttys0/sasquatch cd sasquatch./build.sh
进入解压后到文件夹找到squashfs-root文件夹即可
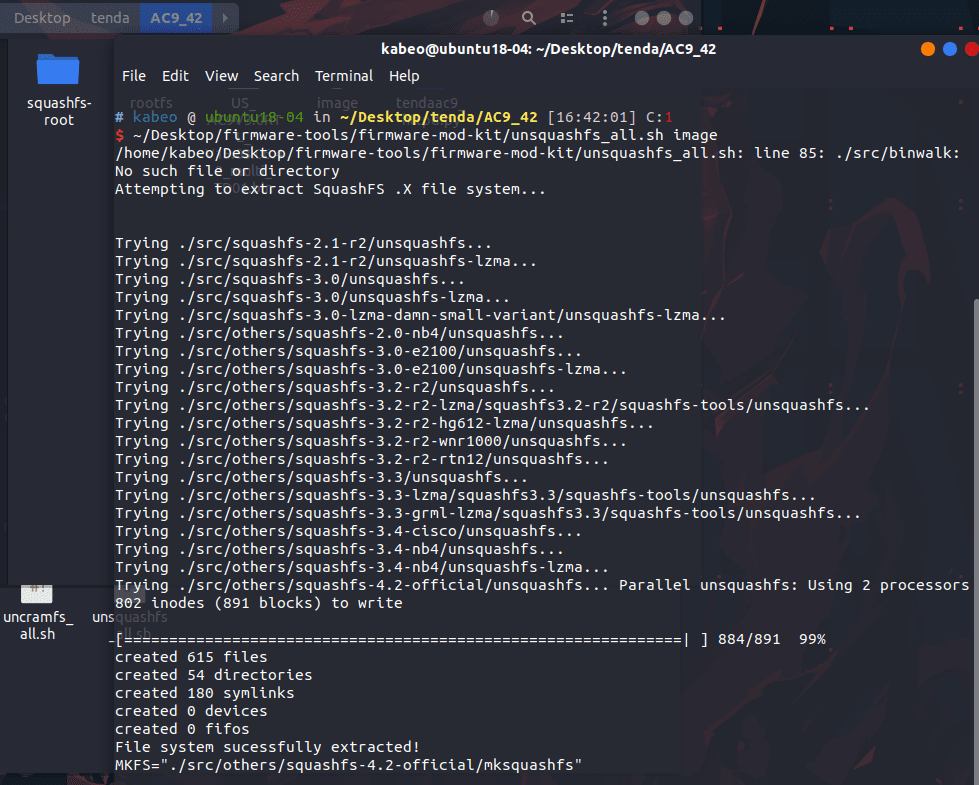
安装firmware-mod-kit
firmware-mod-kit也需要自己编译,经测试发现最佳环境是Ubuntu 16或18
git clone https://github.com/rampageX/firmware-mod-kit.git cd firmware-mod-kit/srcmake
编译完成后使用根目录下脚本unsquashfs_all.sh解压squashfs镜像即可
IoT Fuzz 以往想要对固件进行fuzz比较困难,需要在Qemu上模拟运行,并根据不同的固件还得自定义大量设置。
作为Qiling的代码主要贡献者,在这里介绍一下Qiling:https://github.com/qilingframework/qiling
Qiling基于Unicorn和Qemu用户模式,是一个OS级的模拟仿真框架,能够模拟Windows, MacOS, Linux, BSD, UEFI等系统环境,并支持X86, X86_64, Arm, Arm64, MIPS等多个架构。
常见IoT固件,尤其是路由器固件都是ARM或MIPS架构,因此Qiling能够很好的对其进行模拟执行。
安装Qiling很简单,只需要:
git clone https://github.com/qilingframework/qiling cd qilingsudo python3 setup.py install
下面演示使用Qiling模拟tenda ac15路由器的httpd组件
import os, socket, sys, threadingsys.path.append(".." ) from qiling import *def patcher (ql) : br0_addr = ql.mem.search("br0" .encode() + b'\x00' ) for addr in br0_addr: ql.mem.write(addr, b'lo\x00' ) def nvram_listener () : server_address = 'rootfs/var/cfm_socket' data = "" try : os.unlink(server_address) except OSError: if os.path.exists(server_address): raise sock = socket.socket(socket.AF_UNIX,socket.SOCK_STREAM) sock.bind(server_address) sock.listen(1 ) while True : connection, client_address = sock.accept() try : while True : data += str(connection.recv(1024 )) if "lan.webiplansslen" in data: connection.send('192.168.170.169' .encode()) elif "wan_ifname" in data: connection.send('eth0' .encode()) elif "wan_ifnames" in data: connection.send('eth0' .encode()) elif "wan0_ifname" in data: connection.send('eth0' .encode()) elif "wan0_ifnames" in data: connection.send('eth0' .encode()) elif "sys.workmode" in data: connection.send('bridge' .encode()) elif "wan1.ip" in data: connection.send('1.1.1.1' .encode()) else : break data = "" finally : connection.close() def my_sandbox (path, rootfs) : ql = Qiling(path, rootfs, output = "debug" ) ql.add_fs_mapper("/dev/urandom" ,"/dev/urandom" ) ql.hook_address(patcher ,ql.loader.elf_entry) ql.run() if __name__ == "__main__" : nvram_listener_therad = threading.Thread(target=nvram_listener, daemon=True ) nvram_listener_therad.start() my_sandbox(["rootfs/bin/httpd" ], "rootfs" )
对固件进行fuzz需要结合AFL++ Unicorn模式使用
AFL++ Unicorn安装方式
git clone https://github.com/AFLplusplus/AFLplusplus.git cd AFLplusplusmake binary-only cd unicorn_mode./build_unicorn_support.sh cd unicornafl/bindings/pythonpython3 setup.py install
安装完成后运行python3,执行import unicornafl没有报错则安装成功
Fuzz的示例脚本可以看这里: https://github.com/qilingframework/qiling/blob/master/examples/fuzzing
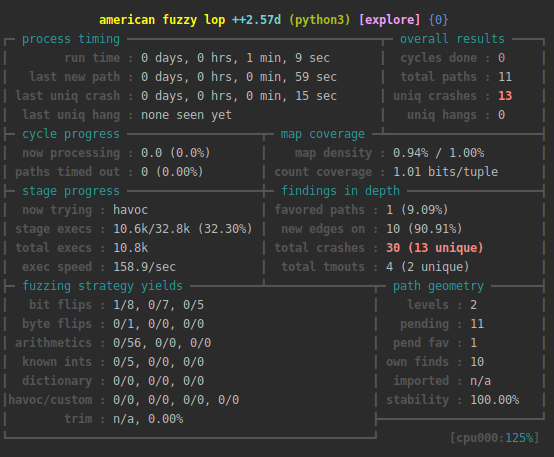
Fuzz结果如下: