施耐德NOE77101以太网模块固件逆向及后门挖掘 前几天参加了 2018工业信息安全技能大赛 ,之前从没有接触过工控安全,这次的比赛让我学习了很多。
此次比赛其中一道题就是考察了施耐德NOE77101固件后门账号漏洞的问题,比赛题目要求是提交该固件Web配置APP的默认账号的密码,事实上这个版本的固件还有其他漏洞,我将在下面研究其中的一部分。
部分思路参考了此次比赛主办方灯塔实验室的文章 http://t.cn/RdORUWo
NOE 771是施耐德Quantum系列PLC的以太网模块,Quantum系列PLC是施耐德的高端PLC,应用在我国核心能源调度网络系统中,如:西气东输的区域子段SCADA系统。
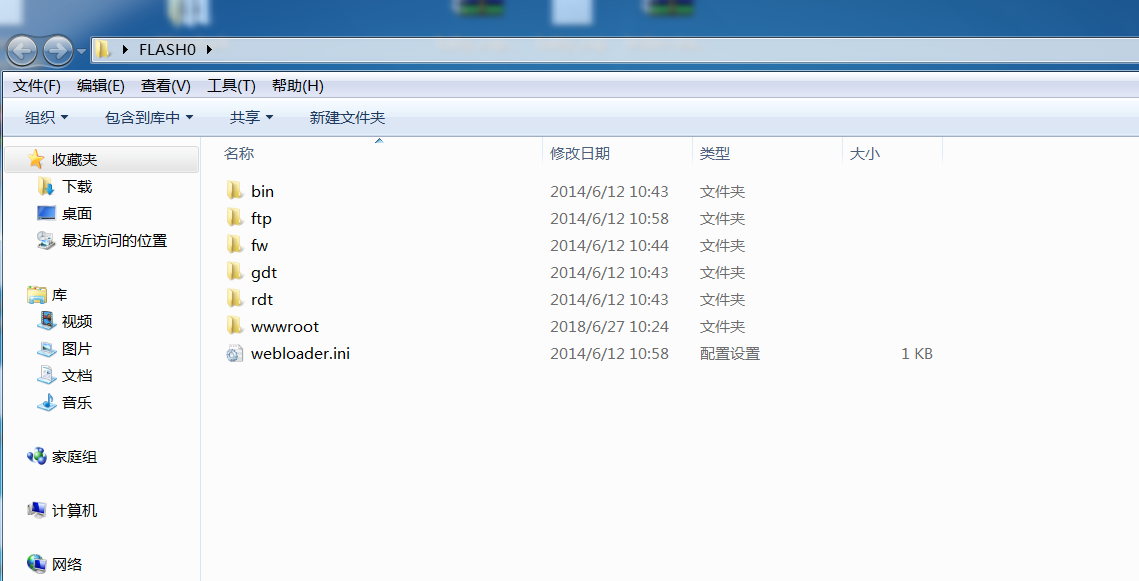
1.静态网站分析 题目给了一个网站文件如下
文件列表
FLASH0
FLASH0/bin
FLASH0/ftp
FLASH0/fw
FLASH0/gdt
FLASH0/rdt
FLASH0/webloader.ini
FLASH0/wwwroot
FLASH0/bin/$TMP_EMPTY_DIR
FLASH0/ftp/$TMP_EMPTY_DIR
FLASH0/fw/crashlog.txt
FLASH0/fw/fw.ini //固件版本
FLASH0/fw/hw.ini
FLASH0/gdt/$TMP_EMPTY_DIR
FLASH0/rdt/password.rde //调用密码
FLASH0/wwwroot/cgi-bin
FLASH0/wwwroot/classes
FLASH0/wwwroot/conf
FLASH0/wwwroot/html
FLASH0/wwwroot/images
FLASH0/wwwroot/index.htm //web首页文件
FLASH0/wwwroot/lib
FLASH0/wwwroot/SchneiderTFE.zip //施耐德MIB文件
FLASH0/wwwroot/secure
FLASH0/wwwroot/unsecure
FLASH0/wwwroot/cgi-bin/$TMP_EMPTY_DIR
FLASH0/wwwroot/classes/jvmver.jar //JAVA APP
FLASH0/wwwroot/classes/RDE.jar //JAVA APP
FLASH0/wwwroot/classes/SAComm.jar //JAVA APP
FLASH0/wwwroot/classes/SysDiag.jar //JAVA APP
FLASH0/wwwroot/classes/webcfg.jar //JAVA APP
FLASH0/wwwroot/classes/webdiag.jar //JAVA APP
FLASH0/wwwroot/classes/XMLParser.jar//JAVA APP
FLASH0/wwwroot/classes/xmlrpc-1.1.jar //JAVA APP
FLASH0/wwwroot/conf/bootp
FLASH0/wwwroot/conf/dhcp
FLASH0/wwwroot/conf/diag
FLASH0/wwwroot/conf/exec
FLASH0/wwwroot/conf/fw
FLASH0/wwwroot/conf/Gcnftcop.sys
FLASH0/wwwroot/conf/glbdata
FLASH0/wwwroot/conf/ioscanner
FLASH0/wwwroot/conf/snmp
FLASH0/wwwroot/conf/bootp/$TMP_EMPTY_DIR
FLASH0/wwwroot/conf/dhcp/$TMP_EMPTY_DIR
FLASH0/wwwroot/conf/diag/$TMP_EMPTY_DIR
FLASH0/wwwroot/conf/exec/kerVer
FLASH0/wwwroot/conf/exec/NOE77101.bin //Quantum Ethernet Executive firmware Ver. 3.60
FLASH0/wwwroot/conf/fw/fw.ini
FLASH0/wwwroot/conf/glbdata/glbdata.ini
FLASH0/wwwroot/conf/ioscanner/$TMP_EMPTY_DIR
FLASH0/wwwroot/conf/snmp/snmp.ini
FLASH0/wwwroot/html/config.js //定义了WEB界面title可做通用设备识别
FLASH0/wwwroot/html/english
FLASH0/wwwroot/html/images
FLASH0/wwwroot/html/lib
FLASH0/wwwroot/html/english/control
FLASH0/wwwroot/html/english/diagnostic
FLASH0/wwwroot/html/english/documentation
FLASH0/wwwroot/html/english/header.htm
FLASH0/wwwroot/html/english/home
FLASH0/wwwroot/html/english/index.htm
FLASH0/wwwroot/html/english/maintenance
FLASH0/wwwroot/html/english/monitoring
FLASH0/wwwroot/html/english/setup
FLASH0/wwwroot/html/english/control/index.htm
FLASH0/wwwroot/html/english/control/menu.htm
FLASH0/wwwroot/html/english/diagnostic/index.htm
FLASH0/wwwroot/html/english/diagnostic/menu.htm
FLASH0/wwwroot/html/english/documentation/index.htm
FLASH0/wwwroot/html/english/documentation/menu.htm
FLASH0/wwwroot/html/english/home/home.htm
FLASH0/wwwroot/html/english/home/index.htm
FLASH0/wwwroot/html/english/home/menu.htm
FLASH0/wwwroot/html/english/maintenance/index.htm
FLASH0/wwwroot/html/english/maintenance/menu.htm
FLASH0/wwwroot/html/english/monitoring/index.htm
FLASH0/wwwroot/html/english/monitoring/menu.htm
FLASH0/wwwroot/html/english/setup/index.htm
FLASH0/wwwroot/html/english/setup/menu.htm
FLASH0/wwwroot/html/images/noe77101.jpg //产品型号图片
FLASH0/wwwroot/html/images/Telemecanique.gif
FLASH0/wwwroot/html/images/TelemecaniquePocketPC.gif
FLASH0/wwwroot/html/lib/css
FLASH0/wwwroot/html/lib/images
FLASH0/wwwroot/html/lib/js
FLASH0/wwwroot/html/lib/css/header.css
FLASH0/wwwroot/html/lib/css/main.css
FLASH0/wwwroot/html/lib/css/menu.css
FLASH0/wwwroot/html/lib/images/left.gif
FLASH0/wwwroot/html/lib/images/moins.gif
FLASH0/wwwroot/html/lib/images/plus.gif
FLASH0/wwwroot/html/lib/images/right.gif
FLASH0/wwwroot/html/lib/js/header.js
FLASH0/wwwroot/html/lib/js/home.js
FLASH0/wwwroot/html/lib/js/index.js
FLASH0/wwwroot/html/lib/js/menu.js
FLASH0/wwwroot/html/lib/js/tools.js
FLASH0/wwwroot/images/eight_io.gif
FLASH0/wwwroot/images/empty.gif
FLASH0/wwwroot/images/hiendcpu.gif
FLASH0/wwwroot/images/logo.gif
FLASH0/wwwroot/images/miniplc.gif
FLASH0/wwwroot/images/module.gif
FLASH0/wwwroot/lib/home.js
FLASH0/wwwroot/lib/main.css
FLASH0/wwwroot/lib/main.js
FLASH0/wwwroot/secure/embedded
FLASH0/wwwroot/secure/system
FLASH0/wwwroot/secure/user
FLASH0/wwwroot/secure/embedded/bandwidth.htm
FLASH0/wwwroot/secure/embedded/chkdsk.htm
FLASH0/wwwroot/secure/embedded/classes
FLASH0/wwwroot/secure/embedded/dhcp_node_config.htm
FLASH0/wwwroot/secure/embedded/format_flash.htm
FLASH0/wwwroot/secure/embedded/french
FLASH0/wwwroot/secure/embedded/ftp_passwd_config.htm
FLASH0/wwwroot/secure/embedded/german
FLASH0/wwwroot/secure/embedded/globaldata.htm
FLASH0/wwwroot/secure/embedded/http_passwd_config.htm
FLASH0/wwwroot/secure/embedded/images
FLASH0/wwwroot/secure/embedded/ioscanning.htm
FLASH0/wwwroot/secure/embedded/messaging.htm
FLASH0/wwwroot/secure/embedded/reboot.htm
FLASH0/wwwroot/secure/embedded/set_readonly.htm
FLASH0/wwwroot/secure/embedded/smtpconf.htm
FLASH0/wwwroot/secure/embedded/smtpdiag.htm
FLASH0/wwwroot/secure/embedded/spanish
FLASH0/wwwroot/secure/embedded/support.htm
FLASH0/wwwroot/secure/embedded/web_page_Ver.ini
FLASH0/wwwroot/secure/embedded/classes/$TMP_EMPTY_DIR
FLASH0/wwwroot/secure/embedded/french/$TMP_EMPTY_DIR
FLASH0/wwwroot/secure/embedded/german/$TMP_EMPTY_DIR
FLASH0/wwwroot/secure/embedded/images/$TMP_EMPTY_DIR
FLASH0/wwwroot/secure/embedded/spanish/$TMP_EMPTY_DIR
FLASH0/wwwroot/secure/system/ctrlstat.htm
FLASH0/wwwroot/secure/system/ethernet.htm
FLASH0/wwwroot/secure/system/plccfg.htm
FLASH0/wwwroot/secure/system/rde.htm
FLASH0/wwwroot/secure/system/riostat.htm
FLASH0/wwwroot/secure/user/$TMP_EMPTY_DIR
FLASH0/wwwroot/unsecure/user
FLASH0/wwwroot/unsecure/user/$TMP_EMPTY_DIR
fw/fw.ini文件内是固件版本,可以看到是3.60版本
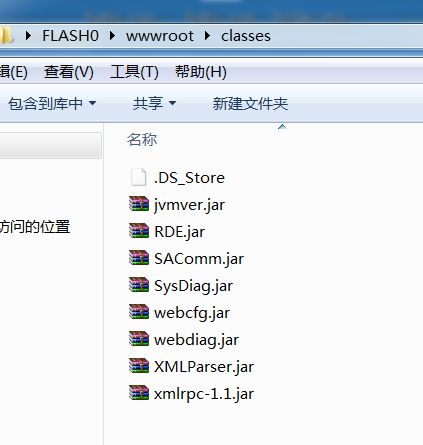
wwwroot/classes/内的jar文件即是Web配置端APP文件
wwwroot/conf/exec/NOE77101.bin很明显就是NOE77101的固件了
那么接下来我们所要做的就是分析jar格式的APP文件,这也是此次题目所要求的,然后再研究bin文件中的其他漏洞
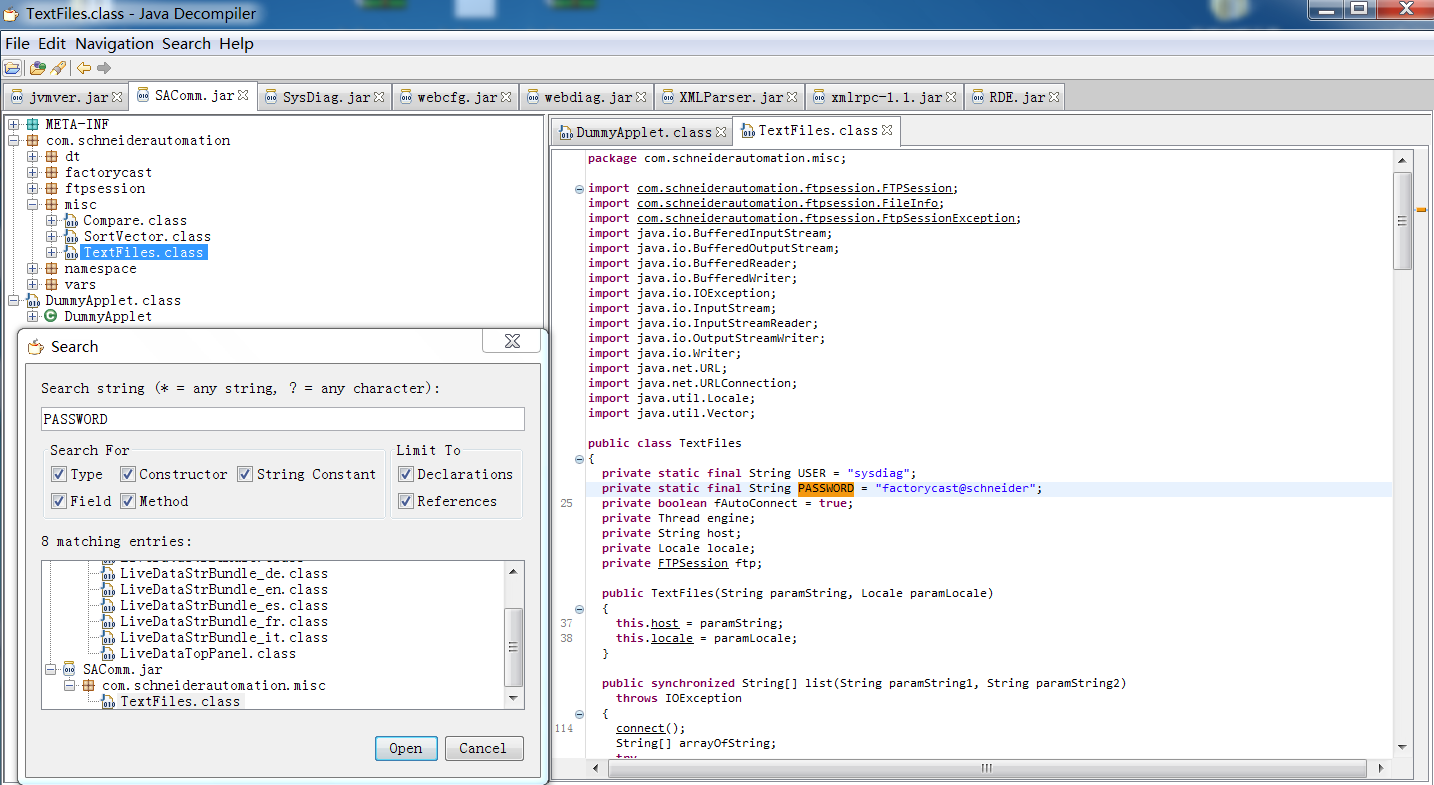
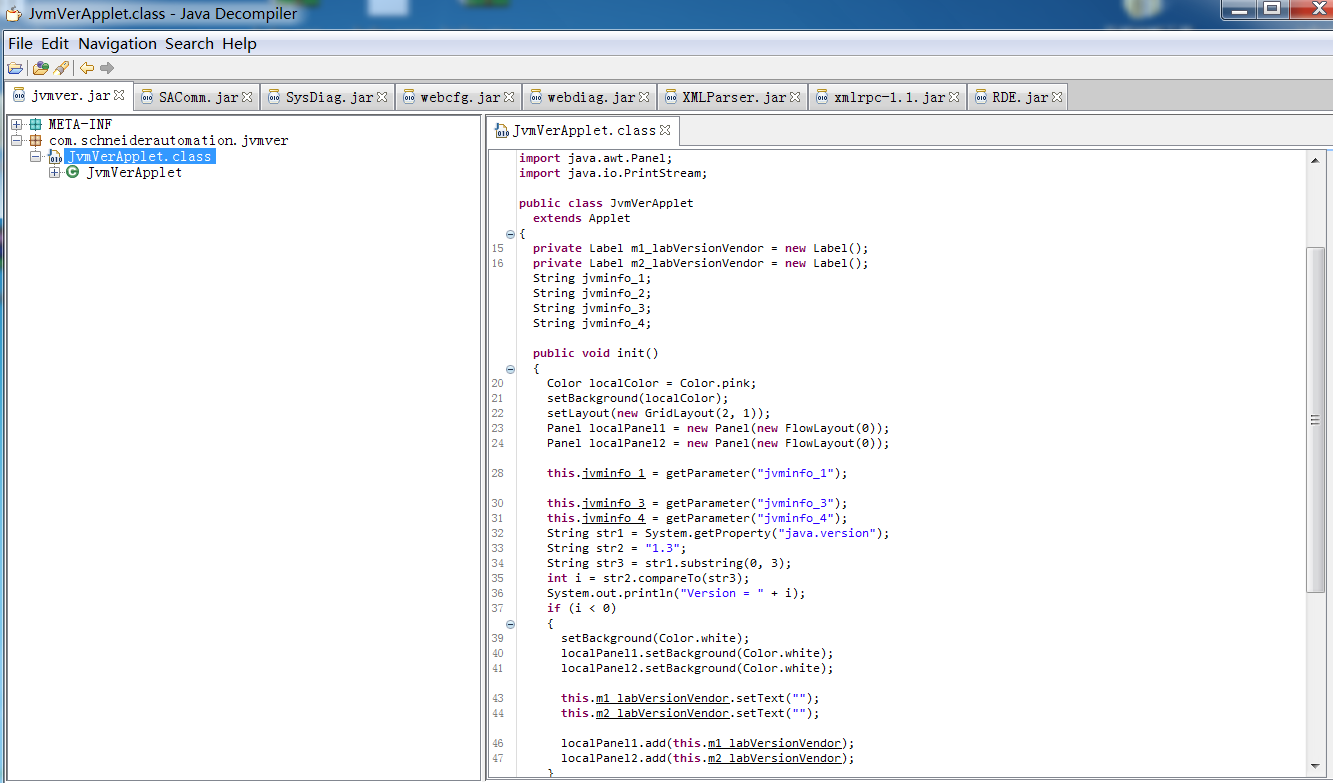
2.Web配置APP默认账户及密码的获取 针对jar包的逆向分析,常使用的工具是JD-GUI,安装该工具需要配置java环境。
打开后拖入所有jar包
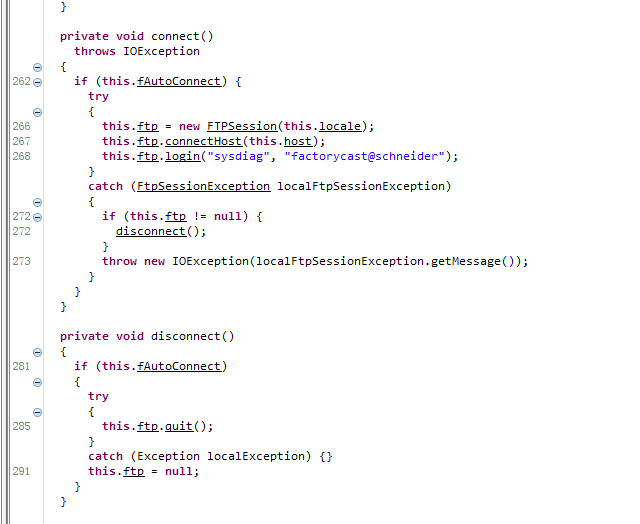
发现没有加壳和混淆,于是我们直奔主题,搜索字符串PASSWORD
密码来的太突然了
USER = “sysdiag”
到这里题目所要求的就完成了
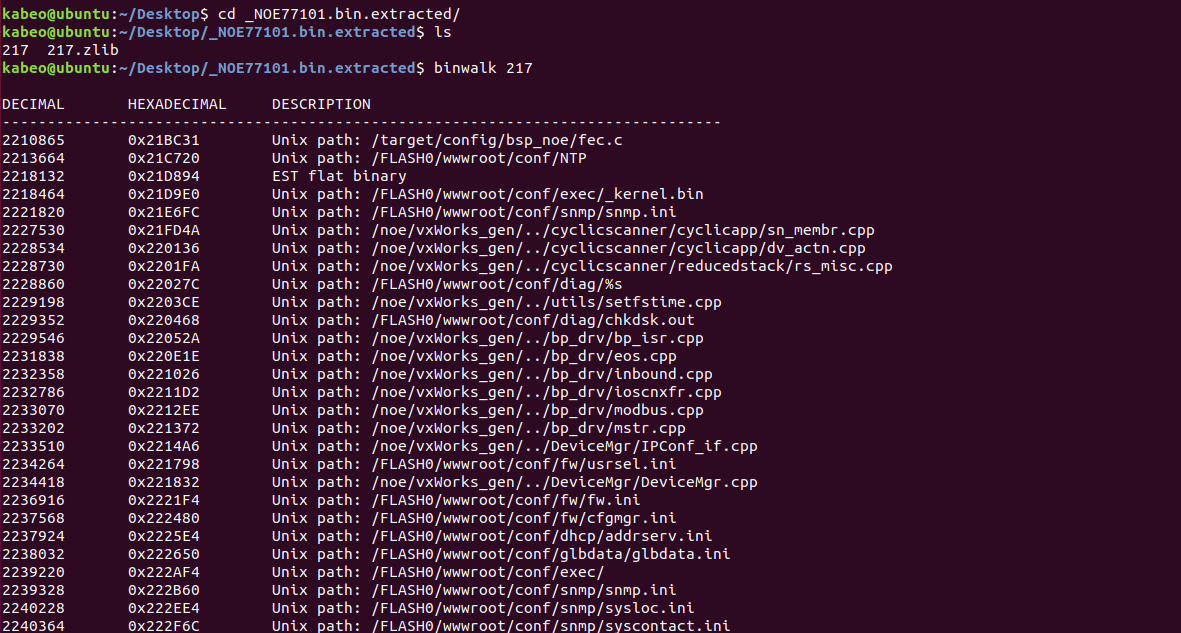
3.bin固件分析 1.binwalk提取文件 将NOE77101.bin在Ubuntu环境下用binwalk进行识别,显示为Zlib压缩类型
使用binwalk -e命令提取文件
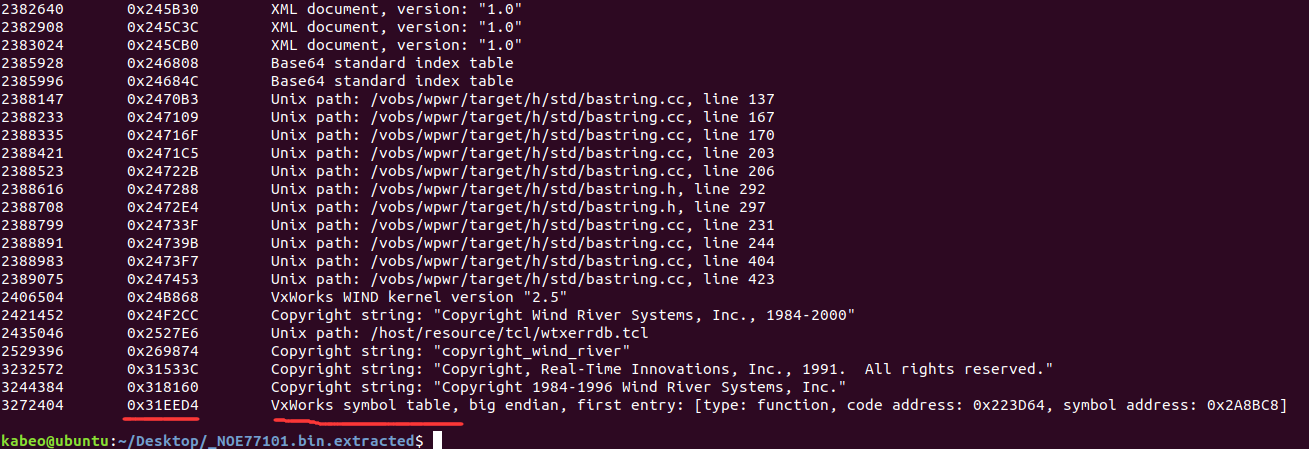
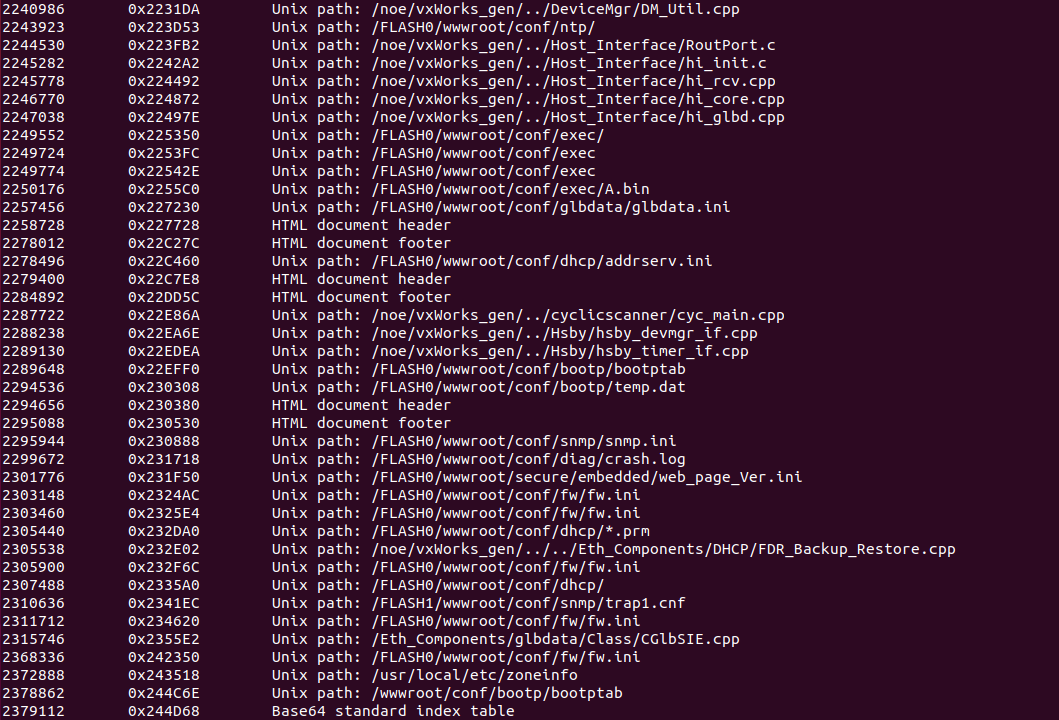
binwalk分析217文件
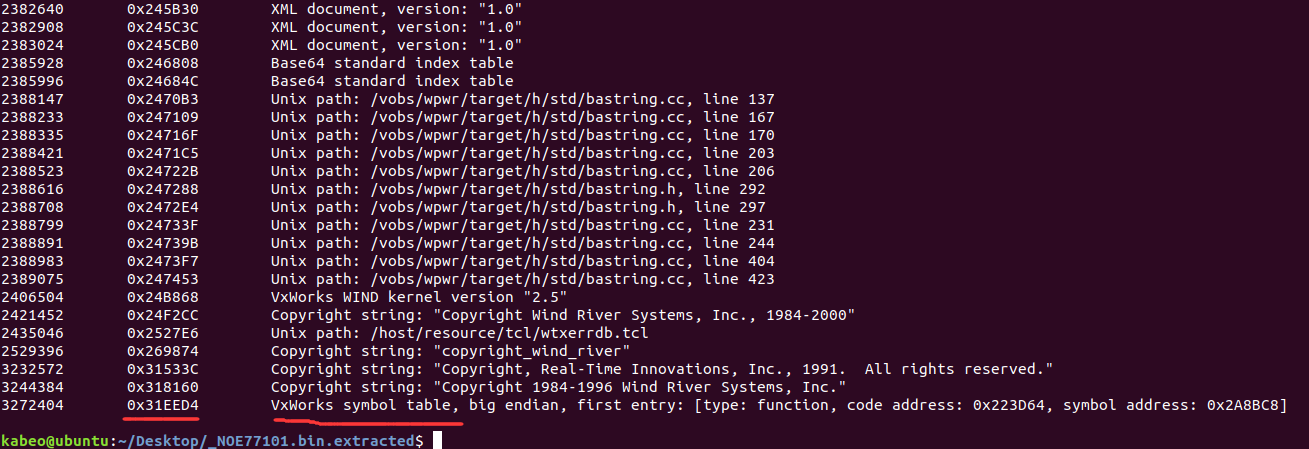
2406504       0x24B868        VxWorks WIND kernel version "2.5"
2421452       0x24F2CC        Copyright string: "Copyright Wind River Systems, Inc., 1984-2000"
2435046       0x2527E6        Unix path: /host/resource/tcl/wtxerrdb.tcl
2529396       0x269874        Copyright string: "copyright_wind_river"
3232572       0x31533C        Copyright string: "Copyright, Real-Time Innovations, Inc., 1991.  All rights reserved."
3244384       0x318160        Copyright string: "Copyright 1984-1996 Wind River Systems, Inc."
3272404       0x31EED4        VxWorks symbol table, big endian, first entry: [type: function, code address: 0x223D64, symbol address: 0x2A8BC8]
从最后几行看到,固件的操作系统版本是VxWorks 2.5,符号表地址也在最后给出,可以用于稍后修复函数名
VxWorks 操作系统是美国WindRiver(风河)公司于设计开发。它以其良好的可靠性和卓越的实时性被广泛地应用在通信、军事、航空、航天等高精尖技术及实时性要求极高的领域中,如卫星通讯、军事演习、弹道制导、飞机导航等。在美国的 F-16、FA-18战斗机、B-2 隐形轰炸机和爱国者导弹上,甚至在火星登陆的探测器也都使用了VxWorks系统。最新的VxWorks7的口号是——为全球智能连接设备和系统提供动力。
由于固件特性,在普通逆向步骤上需要多三个部分
修复代码函数位置
确定固件代码段基址
重构符号表
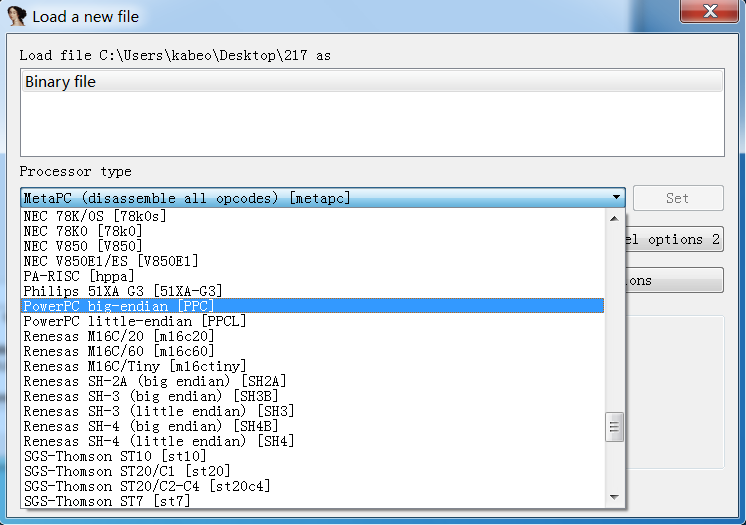
2.IDA分析 载入 将217文件在IDA中分析
载入后没有出现“由于找不到代码段起始地址从而反编译失败”的问题,应该是出题人为了降低难度,已经修复好函数位置。(如果没有修复好的话可以用Ruben的idc脚本,但现在脚本链接不能访问了 http://www.reversemode.com/images/stories/schneider/files/fix_functions_ppc.idc )
载入后如下
确定固件的代码段基址 虽然现在我们可以成功反编译,但我们还需要确定固件的代码段基址才能重构符号表
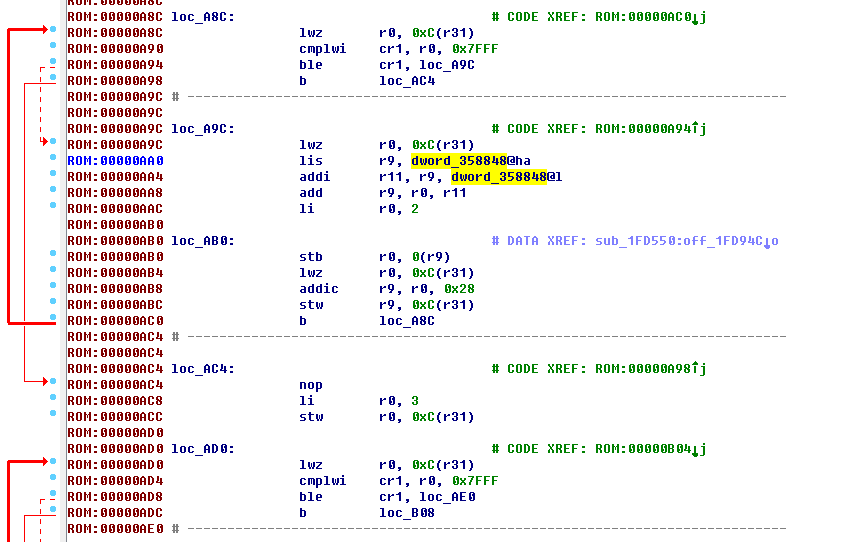
在IDA中使用ALT+T直接搜lis指令,CTRL+T进行向下(上)搜索,发现在00000AA0处的lis指令
ROM:00000AA0 lis r9, dword_358848@ha
观察地址后面的@ha确定基址为0x10000,这也是固件常用基址
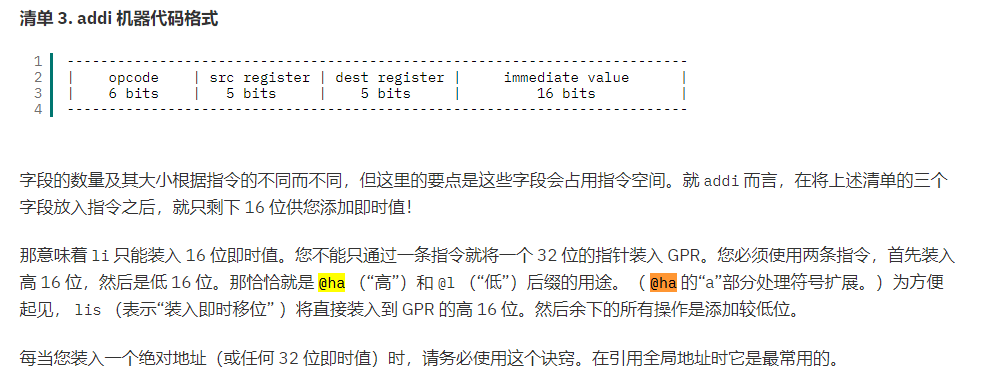
对@h和@ha的问题,在IBM官网看到一篇文章
https://www.ibm.com/developerworks/cn/linux/hardware/ppc/assembly/index.html
具体也不是很懂,还有这篇
http://blog.chinaunix.net/uid-20663797-id-35772.html
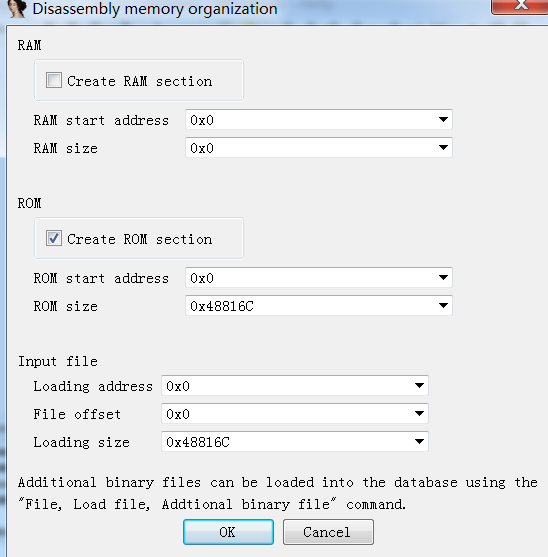
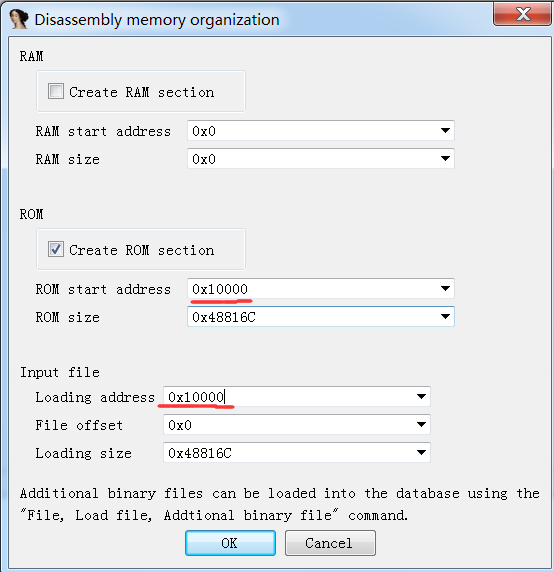
接下来重新载入ida,ppc模式,基址0x10000
成功反编译(和刚刚的应该没有变化)
接下来就该导入符号表了
重构符号表 binwalk分析217文件时最后一行的符号表地址还记得吗?
地址为0x31EED4
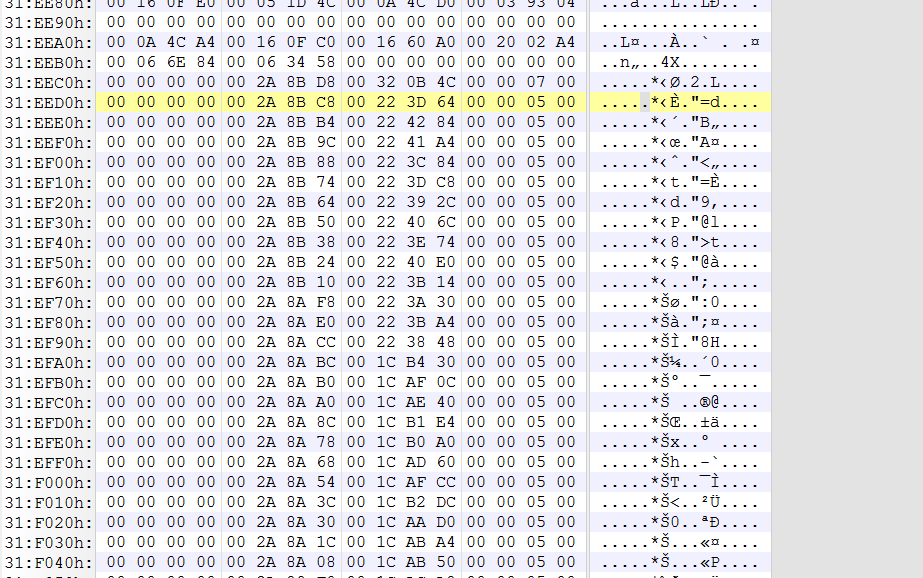
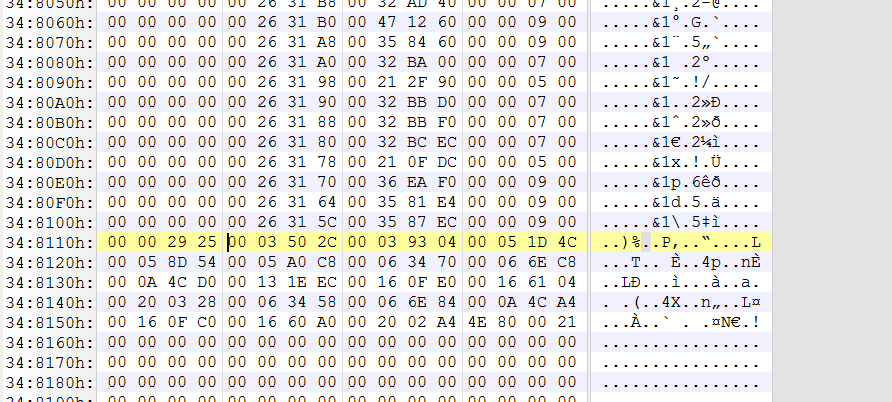
使用010Editor打开217文件,搜索地址0x31EED4(ctrl+G)
VxWorks系列的字节排序有独特的格式,以16个字节为一组数据,前4个字节是函数名的内存地址,后4个字节是函数的内存位置,然后以另4个特征字节数据+4个字节0x00结尾。
于是符号表的起始地址是上一行的0x31EEC4
一直向下查找,根据结构分析,结束地址为0x348114
接下来我们就可以编写IDPython脚本重构符号表
# coding:utf-8
from idaapi import *
import time

eaStart = 0x31eec4
eaEnd = 0x348114
ea = eaStart
while ea < eaEnd:
	offset = 0
	MakeStr(Dword(ea - offset), BADADDR)
	sName = GetString(Dword(ea - offset), -1, ASCSTR_C)
	print sName
	if sName:
		eaFunc = Dword(ea - offset + 4)
		MakeName(eaFunc,sName)
		MakeCode(eaFunc)
		MakeFunction(eaFunc,BADADDR)
		ea = ea + 16
print"ok"
运行脚本
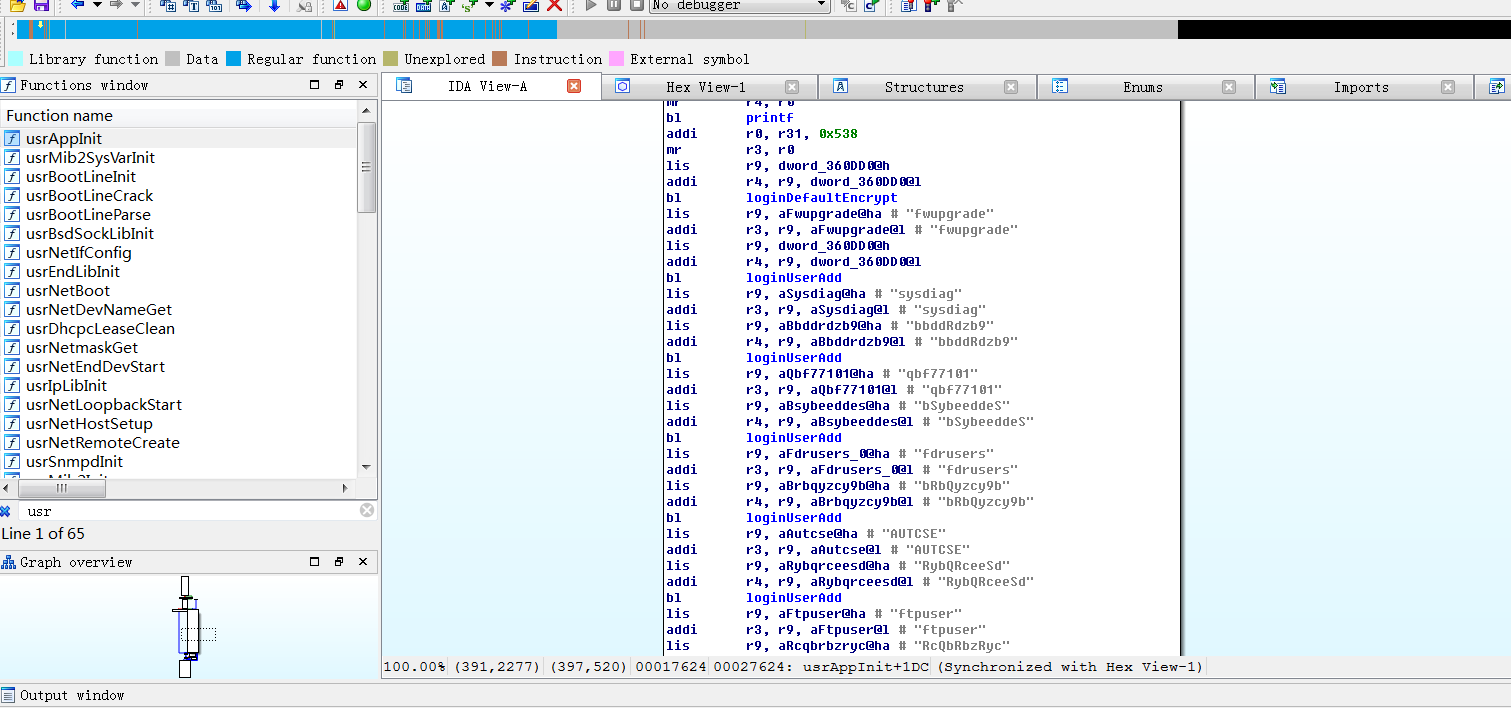
固件后门账户 查看usrAppInit函数,发现多个后门账户
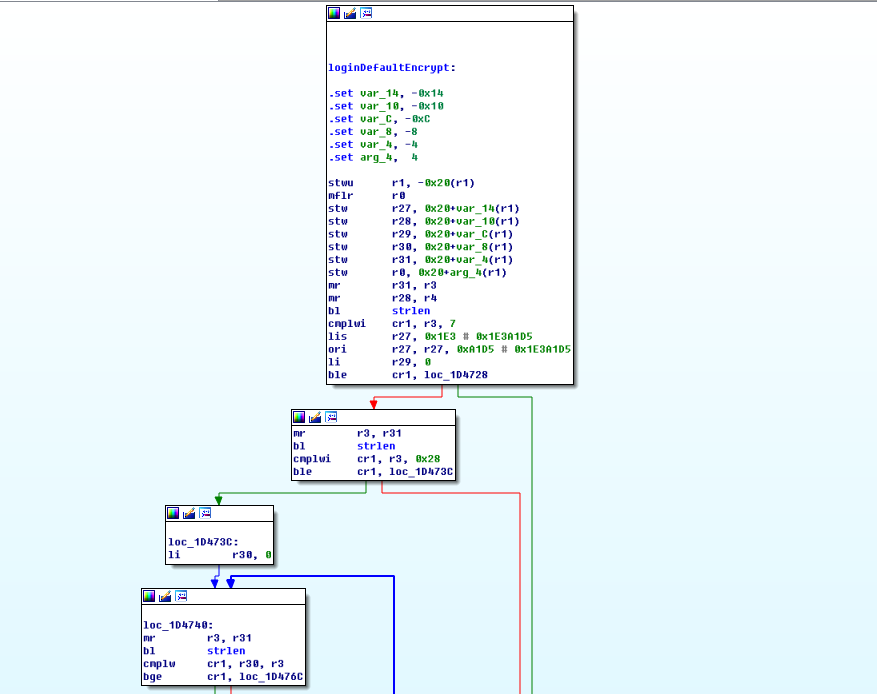
而密码则是经过loginDefaultEncrypt函数哈希加密
/******************************************************************************
*
* loginDefaultEncrypt - default password encryption routine
*
* This routine provides default encryption for login passwords.  It employs
* a simple encryption algorithm.  It takes as arguments a string <in> and a
* pointer to a buffer <out>.  The encrypted string is then stored in the
* buffer.
*
* The input strings must be at least 8 characters and no more than 40
* characters.
*
* If a more sophisticated encryption algorithm is needed, this routine can
* be replaced, as long as the new encryption routine retains the same
* declarations as the default routine.  The routine vxencrypt
* in \f3host/<hostOs>/bin\fP
* should also be replaced by a host version of <encryptionRoutine>.  For more
* information, see the manual entry for loginEncryptInstall().
*
* RETURNS: OK, or ERROR if the password is invalid.
*
* SEE ALSO: loginEncryptInstall(), vxencrypt
*
* INTERNAL
* The encryption is done by summing the password and multiplying it by
* a magic number.
*/

STATUS loginDefaultEncrypt
    (
    char *in,                           /* input string */
    char *out                           /* encrypted string */
    )
    {
    int            ix;
    unsigned long  magic     = 31695317;
    unsigned long  passwdInt = 0;

   if (strlen (in) < 8 || strlen (in) > 40)
        {
	errnoSet (S_loginLib_INVALID_PASSWORD);
        return (ERROR);
        }

    for (ix = 0; ix < strlen(in); ix++)         /* sum the string */
        passwdInt += (in[ix]) * (ix+1) ^ (ix+1);

    sprintf (out, "%u", (long) (passwdInt * magic)); /* convert interger
							to string */
    /* make encrypted passwd printable */

    for (ix = 0; ix < strlen (out); ix++)
        {
        if (out[ix] < '3')
            out[ix] = out[ix] + '!';    /* arbitrary */

        if (out[ix] < '7')
            out[ix] = out[ix] + '/';    /* arbitrary */

        if (out[ix] < '9')
            out[ix] = out[ix] + 'B';    /* arbitrary */
        }

    return (OK);
    }
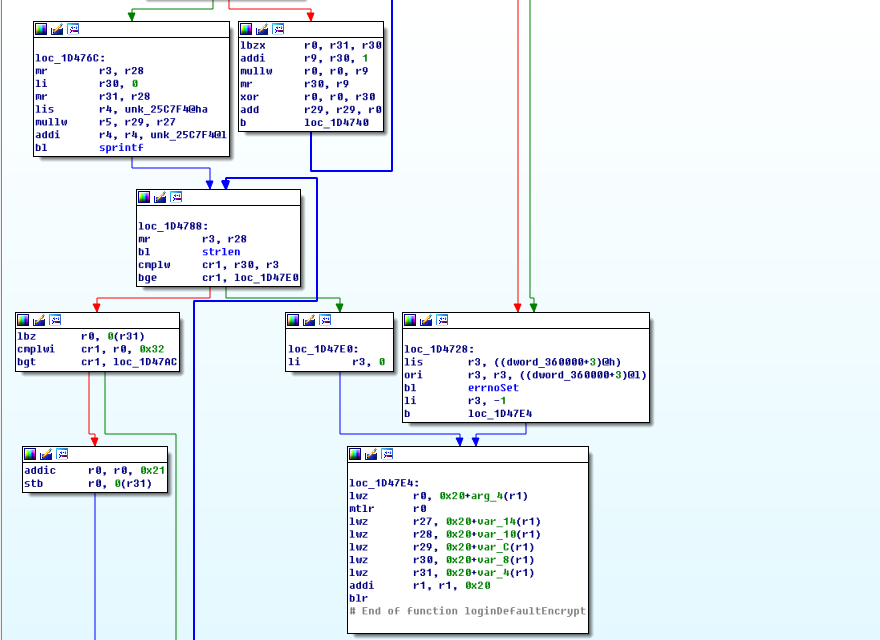
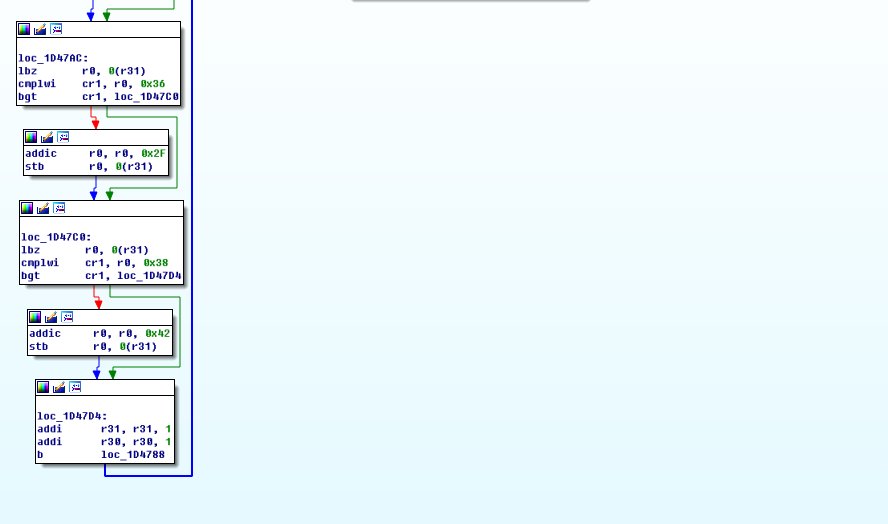
结合源码看汇编就非常清晰了
加密过程:
1.在第一个for循环中密码字符串逐字节与位置下标相乘再按位进行异或操作,然后将每一个字符的运算结果累加起来算出passwdInt。
可以通过随机生成密码来构建一个序列化的输入密码和passwdInt的对应表,同时passwdInt与输出密码之间也可构建对应表,这样输入密码和输出密码讲通过长度有限的Int类型passwdInt打通,这样我们就能通过查表的方式由输出密码得到输入密码。相比于MD5、SHA1等加密算法,vxencrypt加密算法由于加密方式问题导致密文长度受限,以至于存在弱点。
Rapid7 研究员HD Moore曾经发现VxWorks 5.x系统默认加密方式存在缺陷的研究文章
http://cvk.posthaven.com/how-to-crack-vxworks-password-hashes
解密程序
https://github.com/cvonkleist/vxworks_hash
这里贴上C的
// cvk/2010-08-09
#include <stdio.h>
#include <string.h>

// password settings
#define MIN_LENGTH 8
#define MAX_LENGTH 40
char *charset = " !\"#$%&'()*+,-./0123456789:;<=>?@ABCDEFGHIJKLMNOPQRSTUVWXYZ[\\]^_`abcdefghijklmnopqrstuvwxyz{|}~";
#define CHARSET_LENGTH 95

// shortcut hash table
#define MAX_SUM 110000
char sums[MAX_SUM][MAX_LENGTH + 1];

// stage one of the hashing algorithm: the sum
unsigned long sum(char *plaintext) {
  unsigned long s = 0;
  int i;
  for (i = 0; i < strlen(plaintext); i++)
    s += (plaintext[i]) * (i + 1) ^ (i + 1);
  return s;
}

// builds a random password
void random_password(char *password) {
  int i;
  int length = rand() % (MAX_LENGTH - MIN_LENGTH) + MIN_LENGTH;
  for(i = 0; i < length; i++)
    password[i] = charset[rand() % CHARSET_LENGTH];
  password[length] = '\0';
}

// randomly creates checksums
//
// when it discovers a shorter input plaintext for a checksum that has already
// been calculated, it replaces the existing plaintext with the new, shorter
// one
void brute(int runs) {
  int i;
  char password[MAX_LENGTH + 1];
  unsigned long s;

  for(i = 0; i < runs; i++) {
    random_password(password);
    s = sum(password);
    if(s > MAX_SUM) {
      printf("error! sum too big");
      return;
    }
    if(sums[s][0] == '\0' || strlen(password) < strlen(sums[s])) {
      strcpy(sums[s], password);
    }
  }
}

// returns the number of checksums in the table
int count() {
  int i;
  int c = 0;
  for(i = 0; i < MAX_SUM; i++)
    if(sums[i][0] != '\0')
      c++;
  return c;
}

// prints discovered checksums
void dump_table() {
  int i;
  for(i = 0; i < MAX_SUM; i++)
    if(sums[i][0] != '\0')
      printf("%d\t%s\n", i, sums[i]);
}

int main(int argc, char **argv) {
  brute(1000000000);
  printf("%d checksums\n", count());
  dump_table();
}
总结 至此,对施耐德NOE77101的基本探究就结束了,其他漏洞还包括wireshark抓ftp包,账号密码明文显示等,就留着以后研究了,总体来说还是很有收获。
See you again!
